GusOnGames
Physics Simulation & Game Development
Introduction to OpenGL
Part 5: Lights & Materials
The main perception of three dimensions comes from the shades. The human eye can only see colors and shades, but not the outlines. It is the transition from one color to the other that signals the change into our brain. Similarly, the change in the shadows and the difference of light and color perception between our eyes, informs our brain about the third dimension.
Color perception depends on light. The light that reaches our eyes stimulates our optical nerve. This light is emitted from various sources and reflected by the surfaces all around. The color of a surface is the combined result of the light that falls on that surface and its physical characteristics that reflect, absorb or scatter part of that light.
In this part we will try to clear up things about the light and see how we can use all that to our advantage.
The color of things
We use special materials, usually liquid, to dye the surfaces of objects to our desired color. These liquids are called paints. No big news so far. But how do these paints work? How do they change what we see?
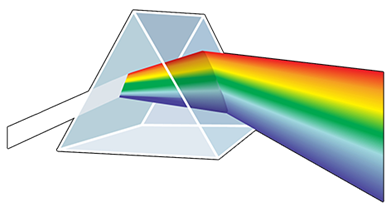
The color we see is the color of the light that reaches our eyes. The light of the sun is what we call the white light. It is the mixture of all the colors we know. Sir Isaak Newton was the first to understand it back in 1666. Many people see the same thing but only one comes to the right conclusions.
The various light sources emit anything from white light to light of a specific color or combination of colors that gives them their characteristic color. The light travels in a straight line but the dust particles in the air refract it and this is a part of the ambient light in the scene.
The light emitting sources are point sources. The light emitted from them goes radially. When the source is too far, say like the sun, we consider the light rays to be parallel. This direct light makes our scene bright, and the objects shine.
The light rays that reach the surface of an object are usually reflected. Some of the light though is absorbed by the object and some is reflected. This results in the color we see for the object. This is the job of the paint; it absorbs all the colors but those we see.
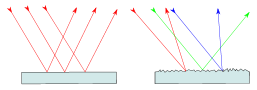
Object surfaces are not as smooth as we think. They are a little rough, enough to scatter the light in various directions. This figure shows the ideal reflection on the left and the actual on the right. This phenomenon is called diffusion and scatters the light adding to the ambient light. Ambient light allows us to see in areas shadowed by objects.
The light that we see is the sum of the direct light that reaches our eyes, the reflected light from the surfaces of the objects in the form of diffuse and specular light, and the ambient light. The color of the objects is also a function of the color of the light that falls on them. If we drop red light on a blue surface we cannot expect to see the surface blue. It will be black if the light is pure red or some version of purple. The color of the light is described by the diffuse attribute of the light.
RGB
Red, Green, Blue. These three are the components that define any color. Our eyes are like camera sensors, or to put it right, we modeled camera sensors after our eyes. Our eyes have light sensing cells which covert the light and the color to signals stimulating our optical nerves.
These sensors are sensitive to red, green, and blue light. The combination of these three colors makes the colors we see. Deep in the human eye there are light receptors which are sensitive to these colors. This is the actual reason we have modeled the camera sensors like this. There are more sensors in the eye, but they are responsible for other features of our perception of the world around us.
OpenGL has modeled anything that has to do with color with red, green, and blue.
Reflections
The rays of light that are reflected off the surface are not scattered in random directions. Reflection follows certain rules. We are all familiar with these rules either by playing with a mirror in the sun or any game with a ball that hits a wall and comes back.
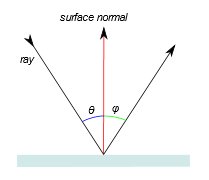
The law of reflection indicates that the angle of incidence equals the angle of reflection. This might mean nothing but looking at this figure it will get clear. Here we have a ray falling on a smooth surface and we mark with red the its normal vector. Angle of incidence is the angle between the ray moving towards the surface and the normal vector and is marked as θ. Angle of reflection is he angle between the ray moving away from the surface and the normal vector and it is marked with φ. These two angles are always equal.
If the surface is rough we might think that this is not the case. If we take a closer look though we will see that the surface at the point of incidence is not in the direction we thought it was. Surfaces as we said are rough at microscopic level, making us think that light behaves strangely, and not according to the laws of nature.
Putting it all together
We have seen how a simple source of light behaves. It is about time to add a light source into our scene and start adding some life to it.
For our needs we have created the lights_materials sample. In this sample we create some lighting models of increasing complexity to show some techniques we can use to add realism to our scenes.
To keep things organized and easy to use we create a class dedicated to light. This is the cg_light class. It allows us to store the characteristics of the light in one place and pass them to the shader in a clean and easy way. It is implemented in the cg_light.h and cg_light.cpp files.
The light has three major attributes: ambient, diffuse, and specular. We will start the description from the end.
Specular light is the light that is directly reflected off the surface of an object to our eyes. Like the reflection of the sunlight on a mirror. The color of this light is the product of the color of the light source and the color of the object. Its intensity depends on the orientation of the object.
Diffuse light is generated by the roughness of object surfaces. Because of the roughness of any surface, part of the light that falls on them is reflected in random directions. Some of this randomly reflected light reaches our eyes. Its color is again a product of the diffuse color of the light and the color of the object.
Ambient light is the light that has no direct source and seems to come from all directions. It is the result of consecutive reflections of the light on various surfaces in the scene, diffusions that may occur and even diffusion caused by the atmosphere. Exact calculation of the ambient light is too complex and time consuming, so we assume that it is a constant light that is the same in all directions.
All the calculations are done in the shader. Starting with the vertex shader which, apart from calculating the vertex position in the view and extract the texture coordinates, has to calculate the position of the vertex in the 3D space as well as its normal vector. These two values will be needed to calculate the lighting.
Now that we have calculated the position and the normal vector of the vertex we can calculate the color of the fragment. We are starting with the easy part of our calculation, the ambient light. This is a simple multiplication between the ambient factor of the light and the light color. We do not have to calculate any direction or reflection, so we are done with one of the light components.
The other two components are the specular light, and the diffused light. These require the calculation of the light direction, the view direction, and the reflection of the light on the surface.
For the specular part of the light, we calculate the strength of the reflection. This determines how the reflection spreads over the surface of the object, a.k.a. how big is the bright spot on the surface. Then we combine it with the properties of the material, how shiny the object is. We will cover to this in the next section when we talk about materials, for the moment we just give it a value.
The diffusion determines the amount of light that comes to our eyes when the object surface is not reflecting the light to us. This is why we need the orientation calculations. We need to know if the light falls directly on it, and if so how bright it may seem to us.
The amount and the hue of the light that falls on the object is the sum of the three components we calculated. Multiplying it with the color of the object we obtain the final color we see.
This is the vertex shader we just described:
// we use the same vertex shader for all the shaders in this chapter
#version 330 core
// these are set in the array buffer
layout(location = 0) in vec3 aPos;
layout(location = 1) in vec3 aNormal;
layout(location = 2) in vec2 aTexCoord;

// the transformation matrices
uniform mat4 camera;
uniform mat4 model;

// data we pass to the fragment shader
out vec2 texCoord;
out vec3 Normal;
out vec3 pos;

void main() {
    // some code optimization
    // this product appears twice in our code
    // so, we calculate it once
    vec4 p = model * vec4(aPos, 1);
    // first occurrence in gl_Position calculation
    gl_Position = camera * p; // model* vec4(aPos, 1);
    texCoord = aTexCoord;
    // vertex position in space (no view)
    // second occurrence in vertex position in 3D
    pos = vec3(p); //  model* vec4(aPos, 1));
    Normal = mat3(transpose(inverse(model))) * aNormal;
}
And this is the fragment shader:
#version 330 core

struct lightsource {
    int type;             // SPOTLIGHT=1, DIRLIGHT=2
    vec3 pos_or_dir;      // light location
    vec3 ambient;         // the ambience property of the light
    vec3 diffuse;         // the diffuse property of the light
    vec3 specular;        // the specular property of the light
};
uniform lightsource light;
uniform vec3 cameraPos;   // viewer location
uniform vec3 objectColor; // object color

in vec3 Normal;           // surface normal
in vec3 pos;              // drawing position

out vec3 color;           // resulting drawing color

void main() {
    // ambient color
    vec3 ambient = light.ambient;
    // normalize is a built-in function in GLSL
    // surface normal
    vec3 norm = normalize(Normal);

    // light direction
    vec3 lightDir;
    if (light.type == 1) // SPOTLIGHT
        lightDir = normalize(light.pos_or_dir - pos);
    else                 // DIRLIGHT
        lightDir = normalize(-light.pos_or_dir);

    // view direction
    vec3 viewDir = normalize(cameraPos - pos);

    // reflection vector, reflect is a built-in function in GLSL
    vec3 reflectDir = reflect(-lightDir, norm);

    // pow, max, dot are built in functions in GLSL
    // specular strength
    float spec = pow(max(dot(viewDir, reflectDir), 0.0), 128);
    // specular color
    vec3 specular = spec * light.specular;

    // diffusion factor (calculated by the reflection angle)
    float diff = max(dot(norm, lightDir), 0.0);

    // and diffusion color
    vec3 diffuse = diff * light.diffuse;

    // light emitted from object is (ambient + diffuse + specular)
    color = (ambient + diffuse + specular) * objectColor;
}
Materials
In the previous section we introduced several parameters that involved the materials of the objects and we just used arbitrary values without any explanation. In this section we are going to explain these parameters and see how they change the appearance on the objects.
So far the only parameter we had for the material of the object was the color. We all know that this is not enough. Different materials behave differently under light. Obsidian for instance is different to black rubber for a car’s tires, although they are both black.
Light and color equations are designed to consider the nature of the material and not only the color. All we must do is create another communication channel between our program and the OpenGL pipeline to pass these parameters. Then with some minor adjustments to the shader we will reach our goal.
To make all our samples comparable and clear we will use a point light source, pure white that emits light evenly to all directions. This will allow us to see and compare the effect of the materials on the result.
We use three different types of reflection to describe the light emitted from an object when the light hits it. These are ambient, diffuse, and specular reflections.
Ambient light reflection is caused by the ambient light that falls on the surface of the object. Some of this light is absorbed and some is reflected. Since there is no clear direction in the light, ambient reflection is uniform at every point on the surface. The color reflected depends on the color of the surface.
Diffuse reflection is caused by the roughness of the surface. This makes the light reflect in random directions.
Specular reflection is the clear reflection we get from smooth surfaces like polished metal. This gives us the shiny look of the objects. Apart from the color reflected, specular reflection has one more parameter, the shininess of the object.
All reflections have three components for each of the red, green, and blue components of the white light, except shininess which is a scalar value. In the following table you can see the values for some common materials as defined by OpenGL.
| Material | ambient (ka) |
diffuse (kd) |
specular (ks) |
specular exponent (m) |
translucency (α) |
| Brass | 0.329412 0.223529 0.027451 |
0.780392 0.568627 0.113725 |
0.992157 0.941176 0.807843 |
27.8974 | 1.0 |
| Bronze | 0.2125 0.1275 0.054 |
0.714 0.4284 0.18144 |
0.393548 0.271906 0.166721 |
25.6 | 1.0 |
| Polished Bronze | 0.25 0.148 0.06475 |
0.4 0.2368 0.1036 |
0.774597 0.458561 0.200621 |
76.8 | 1.0 |
| Chrome | 0.25 0.25 0.25 |
0.4 0.4 0.4 |
0.774597 0.774597 0.774597 |
76.8 | 1.0 |
| Copper | 0.19125 0.0735 0.0225 |
0.7038 0.27048 0.0828 |
0.256777 0.137622 0.086014 |
12.8 | 1.0 |
| Polished Copper | 0.2295 0.08825 0.0275 |
0.5508 0.2118 0.066 |
0.580594 0.223257 0.0695701 |
51.2 | 1.0 |
| Gold | 0.24725 0.1995 0.0745 |
0.75164 0.60648 0.22648 |
0.628281 0.555802 0.366065 |
51.2 | 1.0 |
| Polished Gold | 0.24725 0.2245 0.0645 |
0.34615 0.3143 0.0903 |
0.797357 0.723991 0.208006 |
83.2 | 1.0 |
| Pewter | 0.105882 0.058824 0.113725 |
0.427451 0.470588 0.541176 |
0.333333 0.333333 0.521569 |
9.84615 | 1.0 |
| Silver | 0.19225 0.19225 0.19225 |
0.50754 0.50754 0.50754 |
0.508273 0.508273 0.508273 |
51.2 | 1.0 |
| Polished Silver | 0.23125 0.23125 0.23125 |
0.2775 0.2775 0.2775 |
0.773911 0.773911 0.773911 |
89.6 | 1.0 |
| Emerald | 0.0215 0.1745 0.0215 |
0.07568 0.61424 0.07568 |
0.633 0.727811 0.633 |
76.8 | 0.55 |
| Jade | 0.135 0.2225 0.1575 |
0.54 0.89 0.63 |
0.316228 0.316228 0.316228 |
12.8 | 0.95 |
| Obsidian | 0.05375 0.05 0.06625 |
0.18275 0.17 0.22525 |
0.332741 0.328634 0.346435 |
38.4 | 0.82 |
| Pearl | 0.25 0.20725 0.20725 |
1.0 0.829 0.829 |
0.296648 0.296648 0.296648 |
11.264 | 0.922 |
| Ruby | 0.1745 0.01175 0.01175 |
0.61424 0.04136 0.04136 |
0.727811 0.626959 0.626959 |
76.8 | 0.55 |
| Turquoise | 0.1 0.18725 0.1745 |
0.396 0.74151 0.69102 |
0.297254 0.30829 0.306678 |
12.8 | 0.8 |
| Black Plastic | 0.0 0.0 0.0 |
0.01 0.01 0.01 |
0.50 0.50 0.50 |
32 | 1.0 |
| Black Rubber | 0.02 0.02 0.02 |
0.01 0.01 0.01 |
0.4 0.4 0.4 |
10 | 1.0 |
The cg_material class packs all these parameters and handles the communication with the shading pipeline, writing the values in the shader program memory. The shader we created has a new structure called material which holds the same variables as we did before with the light.
When we have material properties we do not consider the ambient component of the lightsource structure, but we use the ambient component of the material instead.
The vertex shader is the same, but the fragment shader has been modified to use the properties of the material.
#version 330 core

struct lightsource {
    int type;          // SPOTLIGHT=1, DIRLIGHT=2
    vec3 pos_or_dir;   // light location
    vec3 ambient;     // the ambience property of the light
    vec3 diffuse;     // the ambience property of the light
    vec3 specular;     // the ambience property of the light
};
uniform lightsource light;

struct material {
    // how the material reacts to light
    vec3 ambient;
    vec3 diffuse;
    vec3 specular;
    float shine;  // surface shine
};
uniform material mat;

in vec3 Normal;           // surface normal
in vec3 pos;              // drawing position

uniform vec3 cameraPos;   // viewer location

out vec4 color;           // resulting drawing color

void main() {
    // ambient color based on material properties as well
    vec3 ambient = light.ambient * mat.ambient;

    // surface normal
    vec3 norm = normalize(Normal);

    // light direction
    vec3 lightDir;
    if (light.type == 1)
        lightDir = normalize(light.pos_or_dir - pos);
    else
        lightDir = normalize(-light.pos_or_dir);

    // view direction
    vec3 viewDir = normalize(cameraPos - pos);
    // reflection vector
    vec3 reflectDir = reflect(-lightDir, norm);
    // specular strength
    float spec = pow(max(dot(viewDir, reflectDir), 0.0), mat.shine);
    // at last, specular color
    vec3 specular = (spec * mat.specular) * light.specular;

    // diffusion factor (calculated by the reflection angle)
    float diff = max(dot(norm, lightDir), 0.0);
    // and diffusion color
    vec3 diffuse = light.diffuse * (diff * mat.diffuse);

    // light emitted from object is (ambient + diffuse + specular)
    vec3 result = (ambient + diffuse + specular);

    color = vec4(result, 1);
}
Color maps
The previous approach assumes a solid material like a metallic object, or an evenly painted surface. We all know that this is not the case for all objects. In the previous part we learned how to apply textures and make our objects more realistic. Here we will learn how to combine textures with material properties for even better results.
Textures
We are starting with textures. We are going to use a texture as material surface. Color is not enough to represent the details of the surface of the object. It is not enough when we want to draw a wooden box or the earth.
In the previous part we used an image of the earth as a texture for a sphere. Here we will use a similar image on a sphere and an image of wooden planks on a box. Only this time we will treat them as material properties rather than general textures. This will let us select from different images just by selecting different materials.
OpenGL can load several images as textures and we can address them as GL_TEXTURE0, GL_TEXTURE1 and so on. Then we can activate the one we want to use and start drawing.
When we are dealing with a simple texture as we did before all we do is activate the first texture buffer in OpenGL and bind the texture image to that, like this:
glActiveTexture(GL_TEXTURE0);
glBindTexture(GL_TEXTURE_2D, texture);
This simple approach gives meaning to the textureSampler variable in the fragment shader, and we can use it to extract parts of the image and render them on the scene.
The same principles apply when we use material techniques. We see that in the fragment shader we request the color using the texture function, passing it the texture buffer id, in our case GL_TEXTURE0 etc., and the texture coordinate. Now instead of having the texture sampler as a global uniform, we put it in the material structure, which now has one more member the diffuse_map.
Things in the fragment shader are straight forward. The color of our object is:
Now we know how to use the texture and we have reorganized our fragment shader. The next step is to learn what goes before that. How to prepare and set the textures in our program.
If we use GL_TEXTURE0 our sampler2D parameter should be zero, for GL_TEXTURE1 it should be 1, and so on. This was the default behavior of OpenGL when we used one texture, everything was set to 0 and we used GL_TEXTURE0. So, our material class has two new variables: diffuse_map and diffuse_index. diffuse_map stores the texture id of the loaded image, and the diffuse_index is the active texture index. Here is the code to set the parameters:
shdr->set_int("mat.diffuse_map", diffuse_index); // GL_TEXTURE0=0...
glActiveTexture(GL_TEXTURE0 + diffuse_index);
glBindTexture(GL_TEXTURE_2D, diffuse_map);
The fragment color derived from the texture image is used in the calculation of the ambient and the diffuse color of the object:
// ambient color
vec3 ambient = light.ambient * texture(mat.diffuse_map, texCoord).rgb;
// diffusion color
vec3 diffuse = light.diffuse * diff * texture(mat.diffuse_map, texCoord).rgb;
Specular reflections
The use of textures adds to the realism of the scene, but it also raises a new problem. The light is not reflected uniformly on the surface of the object. The object may have materials that do not behave the same under the light. Take the earth for example, the water of the oceans reflects the light more than the land.
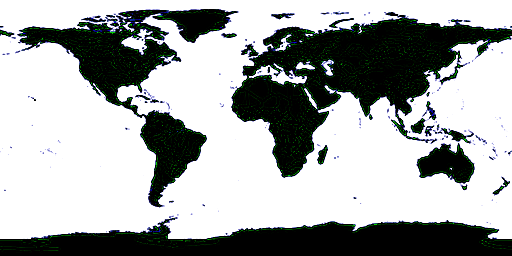
To achieve this kind of lighting we need to pass a per fragment information to the shader. This is done using the same technique as the texture map. We create an image like the texture image, only this time we are interested in the amount of shine each fragment will receive. In the case of our hypothetical example of earth, we paint the oceans white and the land black, to define maximum shine for the water and no shine for the land.
Now we add one more sampler2D texture to our material. This means that our material will activate and bind two texture buffers in OpenGL, one for the texture itself, and one for the specula map.
The complete code in the material class that sets both the diffuse and specular maps is like this:
if (diffuse_index >= 0)
{
    shdr->set_int("mat.diffuse_map", diffuse_index); // GL_TEXTURE0=0...
    glActiveTexture(GL_TEXTURE0 + diffuse_index);
    glBindTexture(GL_TEXTURE_2D, diffuse_map);
}
if (specular_index >= 0)
{
    shdr->set_int("mat.specular_map", specular_index); // GL_TEXTURE0=0...
    glActiveTexture(GL_TEXTURE0 + specular_index);
    glBindTexture(GL_TEXTURE_2D, specular_map);
}
As you can see the code is identical. Now in our program we set the material like this:
m_mat5->set_diffuse(diffuse_texture, 0);  // use GL_TEXTURE0 for texture
m_mat5->set_specular(specular_texture, 1);// use GL_TEXTURE1 for specular
We set the texture images we loaded, and the texture buffers we want to use. The complete fragment shader is this:
#version 330 core

struct lightsource {
    int type;          // SPOTLIGHT=1, DIRLIGHT=2
    vec3 pos_or_dir;   // light location
    vec3 ambient;
    vec3 diffuse;
    vec3 specular;
};
uniform lightsource light;
struct material {
    // how the material reacts to light
    vec3 ambient;
    vec3 diffuse;
    vec3 specular;
    float shine;  // surface shine
    sampler2D diffuse_map;   // the surface texture
    sampler2D specular_map;  // the specular reflection map
};
uniform material mat;
in vec2 texCoord;

in vec3 Normal;           // surface normal
in vec3 pos;              // drawing position
uniform vec3 cameraPos;   // viewer location
out vec4 color;           // resulting drawing color

void main() {
    // ambient color
    vec3 ambient = light.ambient * texture(mat.diffuse_map, texCoord).rgb;

    // surface normal
    vec3 norm = normalize(Normal);
    // light direction
    vec3 lightDir;
    if (light.type == 1)
        lightDir = normalize(light.pos_or_dir - pos);
    else
        lightDir = normalize(-light.pos_or_dir);
    // diffusion factor (calculated by the reflection angle)
    float diff = max(dot(norm, lightDir), 0.0);
    vec3 diffuse = light.diffuse * diff *
                   texture(mat.diffuse_map, texCoord).rgb;
    // specular
    vec3 viewDir = normalize(cameraPos - pos);
    vec3 reflectDir = reflect(-lightDir, norm);
    float spec = pow(max(dot(viewDir, reflectDir), 0.0), mat.shine);
    vec3 specular = light.specular * spec *
                    texture(mat.specular_map, texCoord).rgb;

    // light emitted from object is (ambient + diffuse + specular)
    vec3 result = ambient + diffuse + specular;

    color = vec4(result, 1);
}
Summary
In this chapter we add some realism to our scenes. Using light and textures we can really simplify our drawing, while adding to the quality of the user experience. The image plays a major role in the way perceive what we see.
- We learned the basic concepts of color and light.
- We learned about reflected and ambient light.
- How the properties of the materials change what we see
- How to use images to draw complex surfaces with varying materials