GusOnGames
Physics Simulation & Game Development
Introduction to OpenGL
Part 1: The main application window
The Windows’ window
Before we start building our game infrastructure, we should spend some time to see how an interactive program is made and especially in Windows.
The program loop
UI based programs run until the user quits. They constantly 'read' the keyboard or any other input device and alter their behavior and response accordingly. This is achieved with an endless loop in which we 'read' user input and respond as we can see in this code:
int main() {
    // initialize stuff
    // and loop for ever
    while (1) {
        // read user input, from keyboard, mouse etc.
        // break loop if user asks to
        // perform any other task
    }
    // clean up stuff
}
Doing it all in Windows
A windows native application must have a function called WinMain instead of a main function we have for console-based applications in C/C++. The main function still exists but it is burried deep in the Windows system libraries.
int WINAPI WinMain(HINSTANCE hInstance, HINSTANCE hPrevInstance, LPTSTR lpCmdLine, int nCmdShow)The first thing we encounter is the WINAPI before the function name. This is a Windows specific convention. It has to do with the way arguments are passed on the stack and who is responsible for cleaning it up at the end.
The parameters of the function are:
- hInstance is the handle of the current instance of the program. It is a value assigned by the operating system to identify the program in memory.
- hPrevInstance is always NULL. It was used in 16-bit windows and it was kept for code compatibility.
- lpCmdLine the complete command line used to invoke the program.
- nCmdShow is a flag indicating how the main window will be upon startup.
Here is a sample WinMain function:
int WINAPI WinMain(HINSTANCE hInstance, HINSTANCE hPrevInstance, LPTSTR lpCmdLine, int nCmdShow) {
    // perform all required initializations
    initialize_application(hInstance, nCmdShow);

    // load keyboard shortcuts (WINDOWS' stuff)
    HACCEL hAccelTable = LoadAccelerators (hInstance, MAKEINTRESOURCE(IDC_BASICWINDOW));

    // message (msg) variable encodes information about user interaction
    // or other system wide event
    MSG msg;
    // Main message loop:
    // waits for user interaction, decodes it, and passes the message (msg)
    // to WndProc below
    while (GetMessage(&msg, nullptr, 0, 0)) {
        if (!TranslateAccelerator(msg.hwnd, hAccelTable, &msg)) {
            // let windows process the message
            TranslateMessage(&msg);
            // ask windows to pass the message to WndProc
            DispatchMessage(&msg);
        }
    }

    return (int)msg.wParam;
}
initialize_application: Perform some basic Windows initializations.
LoadAccelerators: Load any keyboard shortcuts we may need in our application.
Main program loop:
GetMessage: wait for user interaction.
TranslateAccelerator: check for specific keyboard input.
TranslateMessage: convert input to some meaningful stuff.
DispatchMessage: pass the input to our message handling function, WndProc we see here:
Upon application initialization we 'told' Windows that we have a function which should be called to handle messages and events. This Dispatch function is called from DispatchMessage
// the callback windows calls when needed via DispatchMessage
LRESULT CALLBACK WndProc(HWND hWnd, UINT message, WPARAM wParam, LPARAM lParam) {
    switch (message) {
    // menu command
    case WM_COMMAND: {
        int wmId = LOWORD(wParam);
        // Parse the menu selections:
        switch (wmId)
        {
        // exit menu command
        case IDM_EXIT:
            DestroyWindow(hWnd);
            break;
        default:
            return DefWindowProc(hWnd, message, wParam, lParam);
        }
    }
    break;
    // draw window contents
    case WM_PAINT: {
        PAINTSTRUCT ps;
        HDC hdc = BeginPaint(hWnd, &ps);
        // TODO: Add any drawing code that uses hdc here...
        EndPaint(hWnd, &ps);
    }
    break;
    // destroy the window, here we can do some cleanup
    case WM_DESTROY:
        // ok to exit
        PostQuitMessage(0);
        break;
    default:
        return DefWindowProc(hWnd, message, wParam, lParam);
    }
    return 0;
}
This function is our main dispatch mechanism. The system calls it passing it these parameters:
- hWnd: the handle of the main window. This is an id assigned by the system to our window upon its creation in the initialize_application¬ function.
- Message: is the identifier of the event or message
- wParam, lParam: are additional information holding the details of the message.
At this point I would like to point how the program terminates. Initially we respond to the message WM_COMMAND, which means that a menu command was selected. In this case the wParam parameter holds the menu command ID encoded in the low 16 bits. Using the LOWORD C++ macro we isolate the low part of the variable and if the value is equal to exit command ID, we call the DestroyWindow system function indicating we want to destroy the window and exit the application. As consequence the system calls WndProc, this time with the WM_DESTROY. Our response to that is a zero in our PostQuitMessage call. This causes GetMessage to return zero and break the main program loop.
Adding OpenGL
The next step is to create a window that connects with OpenGL to give us access to the advanced drawing it provides.
Windows drawing basics
Whenever the system wants to update the contents of our window it sends a WM_PAINT message to our WndProc function.
In order to understand what we are doing we need to take a closer look at the way Windows handle drawing. In the WndProc we accept a message called WM_PAINT. This tells us that we must update the contents of the window. In our sample we do not do much. There is one thing to notice here. The communication channel between our program and the Windows drawing subsystem. Here is the code fragment for that message:
case WM_PAINT:
{
    // details about the command are in this struct
    PAINTSTRUCT ps;
    // HDC in our telephone line to the video driver
    HDC hdc = BeginPaint(hWnd, &ps);
    // TODO: Add any drawing code that uses hdc here...
    // EndPaint tells the system we are done
    EndPaint(hWnd, &ps);
}
break;
The communication channel is called device context, and we obtain its ID. You can think of it as a canvas we can draw on, or as a communication line with the graphics driver. This channel is temporary, and it is released with the call to EndPaint.
Initializing OpenGL window
When we need to use OpenGL, we create our window with a special parameter. The purpose is to have a simple window representing the classic triangle. We added the CS_OWNDC style to our windows class description. This tells Windows that we want to maintain a permanent channel of communication with video driver. This is a requirement because we will not use the default windows drawing mechanism but instead, we will repaint the screen whenever we want.
We will use OpenGL double buffering to have smooth drawing. This is like having two drawing surfaces. We show one surface, and we hide the second. All drawing is taking place on the hidden surface and when we are done, we swap them. This presents the scene to the viewer all at once without the drama of rendering object by object, especially when we have animation. The sample that draws with OpenGL is basic_opengl.
The biggest change we need to make is the creation of the window that does all the drawing. In our case this is the main window of the application. We create our main window and then we perform a series of OpenGL initializations and connections with our window. So, let us try to put things in order and explain what we are doing.
First, we create the window like we do in any Windows application by calling the CreateWindow. No surprises so far. The next thing we do is request the communication channel with the drawing mechanism we talked about before. For this we call the GetDC system function which returns us its ID. Needless to say that whenever we fail, we abort the whole operation.
Next, we initialize a PIXELFORMATDESCRIPTOR variable. This is a struct describing the structure of our desired OpenGL drawing surface. We use this description to see if the drawing channel we got before is compatible with what we want. This is done by calling ChoosePixelFormat. If the display is compatible, we are given a non-zero value, which is an index in the array of display modes supported.
We then pass this index to the SetPixelFormat, which performs the appropriate setup in the display driver for OpenGL to function. If this is successful, we create a new channel to use for OpenGL drawing based on the system channel we obtained earlier, calling the wglCreateContext function.
The last step is to enable this drawing channel by making it the current OpenGL drawing channel. We do this by calling the wglMakeCurrent function. If it succeeds, we call ShowWindow as we would do in any other application.
All the magic is initiated in the initialize_window function which calls the create_GL_window to do all we have presented so far. Here is the function:
// This function creates our OpenGL Window
HWND create_GL_window(int wid, int hei, int bitsPerPixel, const char* title, HINSTANCE hInstance, const char* classname, int stencilBuffer)
{
    DWORD windowStyle = WS_OVERLAPPEDWINDOW;				// define our window style
    DWORD windowExtendedStyle = WS_EX_APPWINDOW;			// define the window's extended style

    int width = wid;
    int height = hei;

    RECT windowRect = { 0, 0, width, height };				// define our window coordinates

    // adjust window, account for window borders
    AdjustWindowRectEx(&windowRect, windowStyle, 0, windowExtendedStyle);
    g_window.hWnd = CreateWindow(classname, title, WS_OVERLAPPEDWINDOW,
        0, 0, windowRect.right - windowRect.left, windowRect.bottom - windowRect.top, nullptr, nullptr, hInstance, nullptr);

    if (g_window.hWnd == 0)								// was window creation a success?
    {
        return g_window.hWnd;							// if not return false
    }

    g_window.hDC = GetDC(g_window.hWnd);							// grab a device context for this window
    if (g_window.hDC == 0)								// did we get a device context?
    {
        // Failed
        DestroyWindow(g_window.hWnd);					// destroy the window
        g_window.hWnd = 0;								// zero the window handle
        return g_window.hWnd;							// return false
    }

    PIXELFORMATDESCRIPTOR pfd =								// pfd tells windows how we want things to be
    {
        sizeof(PIXELFORMATDESCRIPTOR),						// size of this pixel format descriptor
        1,													// version number
        PFD_DRAW_TO_WINDOW |								// format must support window
        PFD_SUPPORT_OPENGL |								// format must support opengl
        PFD_DOUBLEBUFFER,									// must support double buffering
        PFD_TYPE_RGBA,										// request an rgba format
        (BYTE)bitsPerPixel,									// select our color depth
        0, 0, 0, 0, 0, 0,									// color bits ignored
        0,													// no alpha buffer
        0,													// shift bit ignored
        0,													// no accumulation buffer
        0, 0, 0, 0,											// accumulation bits ignored
        16,													// 16bit z-buffer (depth buffer)
        (BYTE)stencilBuffer,								// stencil buffer
        0,													// no auxiliary buffer
        PFD_MAIN_PLANE,										// main drawing layer
        0,													// reserved
        0, 0, 0												// layer masks ignored
    };

    GLuint PixelFormat = ChoosePixelFormat(g_window.hDC, &pfd);	// find a compatible pixel format
    if (PixelFormat == 0)								        // did we find a compatible format?
    {
        // Failed
        ReleaseDC(g_window.hWnd, g_window.hDC);					// release our device context
        g_window.hDC = 0;										// zero the device context
        DestroyWindow(g_window.hWnd);							// destroy the window
        g_window.hWnd = 0;										// zero the window handle
        return g_window.hWnd;									// return false
    }

    if (SetPixelFormat(g_window.hDC, PixelFormat, &pfd) == false)// try to set the pixel format
    {
        // Failed
        ReleaseDC(g_window.hWnd, g_window.hDC);					// release our device context
        g_window.hDC = 0;										// zero the device context
        DestroyWindow(g_window.hWnd);							// destroy the window
        g_window.hWnd = 0;										// zero the window handle
        return g_window.hWnd;									// return false
    }

    g_window.hRC = wglCreateContext(g_window.hDC);				// try to get a rendering context
    if (g_window.hRC == 0)										// did we get a rendering context?
    {
        // Failed
        ReleaseDC(g_window.hWnd, g_window.hDC);					// release our device context
        g_window.hDC = 0;										// zero the device context
        DestroyWindow(g_window.hWnd);							// destroy the window
        g_window.hWnd = 0;										// zero the window handle
        return g_window.hWnd;									// return false
    }

    // make the rendering context our current rendering context
    if (wglMakeCurrent(g_window.hDC, g_window.hRC) == false)	// failed
    {
        wglDeleteContext(g_window.hRC);							// delete the rendering context
        g_window.hRC = 0;										// zero the rendering context
        ReleaseDC(g_window.hWnd, g_window.hDC);					// release our device context
        g_window.hDC = 0;										// zero the device context
        DestroyWindow(g_window.hWnd);							// destroy the window
        g_window.hWnd = 0;										// zero the window handle
        return g_window.hWnd;									// return false
    }
    //glfwSwapInterval(0);

    ShowWindow(g_window.hWnd, SW_NORMAL);						// make the window visible
    g_window.isMinimized = false;								// set isMinimized to false

    resize_window(width, height);
    // UpdateWindow(g_window.hWnd);

    return g_window.hWnd;										// window creating was a success
}
Terminating OpenGL window
All these device contexts we used to do our job are valuable system resources and we should release them when we no longer need them. So, upon program exit we call our function destroy_GL_window instead of calling DestroyWindow directly. This function releases the device contexts we reated and then destroys the window.
Modifying the program loop
Now we will modify the main loop of our program to accommodate for OpenGL drawing.
First we will stop using GetMessage and use PeekMessage instead. This function check the message queue and if a message is pending it behaves like old one. If no message is pending it returns allowing us to perform any tasks we want. Here is how our program loop looks like:
bool bLooping = true;
MSG msg;
while (bLooping)
{
    // check for windows messages and process them
    if (PeekMessage(&msg, NULL, 0, 0, PM_REMOVE) != 0)
    {
        // destroy window was invoked (escape or Alt-F4)
        if (msg.message == WM_QUIT)
            bLooping = false;

        TranslateMessage(&msg);
        DispatchMessage(&msg);
    }
    else  // no messages, just loop for next frame
    {
        if (g_window.isMinimized)	// if window is minimized
        {
            // yield back to system, do not waste processing power
            WaitMessage();
        }
        else
        {
            // here we do our own processing and drawing
        }
    }
}
When our program window is not minimized we get on with our processing, otherwise we just pass control to the operating system without wasting any system resources and slowing down other programs.
Drawing in OpenGL
When we created the main window of our game, we used a PIXELFORMATDESCRIPTOR structure. We used the value PFD_DOUBLEBUFFER to initialize it. This means that we have two drawing surfaces for smooth drawing.
From our main loop, first we call our function that does the dirty work of drawing everything, and then we call the SwapBuffers function to that displays the contents of the hidden drawing surface.
// render scene
frame_render();
// Swap Buffers (Double Buffering)
SwapBuffers(g_window.hDC);
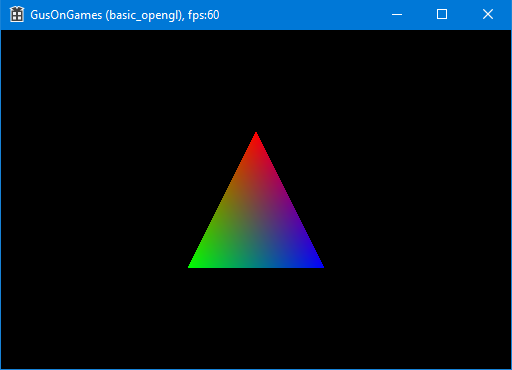
Let us look at the frame_render function and look at our first scene.
void frame_render() {
    // first step: set up our camera
    // black background
    glClearColor(0.0f, .0f, 0.0f, 1.f);
    // clear screen and depth buffer
    glClear(GL_COLOR_BUFFER_BIT | GL_DEPTH_BUFFER_BIT);

    // set the viewport to the whole window
    glViewport(0, 0, (GLsizei)(g_window.vwidth), (GLsizei)(g_window.vheight));
    // select the projection matrix
    glMatrixMode(GL_PROJECTION);
    // reset the projection matrix
    glLoadIdentity();
    // set the viewing angle to 45 degrees
    // set the aspect ratio of the window
    // and draw everything between 1 and 1000 units from the viewer
    gluPerspective(45.0f, (float)(g_window.vwidth) /
                         (float)(g_window.vheight), 1.0f, 1000.0f);

    // second step: the world we want to picture
    // select the modelview matrix
    glMatrixMode(GL_MODELVIEW);
    // reset the modelview matrix
    glLoadIdentity();

    // move 6.0 units apart
    glTranslatef(0.f, 0.0f, -6.0f);

    // drawing using triangles
    glBegin(GL_TRIANGLES);

    // set the color to red
    glColor3f(1.0f, 0.0f, 0.0f);
    // top vertex
    glVertex3f(0.0f, 1.0f, 0.0f);

    // set the color to green
    glColor3f(0.0f, 1.0f, 0.0f);
    // bottom left vertex
    glVertex3f(-1.0f, -1.0f, 0.0f);

    // set the color to blue
    glColor3f(0.0f, 0.0f, 1.0f);
    // bottom right vertex
    glVertex3f(1.0f, -1.0f, 0.0f);

    // finished drawing the triangle
    glEnd();
}

This function is made up of two distinct parts. The camera that takes a picture, and the world we want to take a picture of.
The sensor of our camera is our window. In the beginning we clear the camera sensor. OpenGL will automatically remove hidden surfaces and objects. Then we define the portion of the sensor we want to use. Our camera is more capable than any ordinary camera. The next step is to set up our lens. For our sample we have a lens with a viewing angle of 45°, set the aspect ratio of the sensor and tell it to capture anything from one unit to one thousand units from our location. Note here that we are specifying the nearest and furthest distances, so they are positive. The default position of the camera is at the position v(0,0,0), with the up direction being at the z-axis, and looking towards the negative z-axis.
When we are done with the camera, we start describing our objects. OpenGL automatically calculates the transformations and draws everything, taking care of hidden surface removal.
In this sample we draw a simple triangle six units towards the negative of the z-axis.
OpenGL and the transformation matrix
In the second part of this book, we were introduced to matrices and how we can use them to perform transformations and projections. OpenGL uses matrices as well. Here we are going to take a closer look at how it uses them to perform all its calculations.
In OpenGL there is one active matrix for the camera settings, identified as GL_PROJECTION , one for the model world identified as GL_MODELVIEW, and some more that we will see in time. We select them calling glMatrixMode, with the appropriate matrix ID. These matrices are initialized to the identity matrix when we call glLoadIdentity. From that point on every change is accumulated, so every time we are left with the latest version of the matrix.
In our sample we start with the camera matrix, or projection matrix as it is called. We set it to identity matrix and then we call gluPerspective, to set it appropriately to behave like the camera we have in mind.
A similar operation is performed for the world, or modelview matrix. First, we set it to identity matrix and then we modify it to move all the objects 6 units apart from the viewer with the glTranslatef function. This tells OpenGL where the objects are and then we draw them using coordinates local to them. This allows us to draw similar objects, say boxes, in many locations in a scene, saving us a lot of memory and processing time.
Keeping track of time
Our perception of the world and events has to do with time. Everything happens at some speed and that is what we need. A car covers some distance at a specific time interval while a free-falling object accelerates at a standard rate. Another thing is the processing speed of different computer systems. In the old days it used to be impossible to play some appications on fast computers because they run like hell. Programmers were relying on the processing power of the system to keep track of elapsed time and so when you got a faster computer it was impossible to run the application.
This make clear that what we need to make our applications realistic is to know how much time has elapsed since the last time we updated our virtual world and advance everything accordingly. Assume that we have a car that moves at 72 kph. That converts to 20 meters per second. So, if our game runs at 100 frames per second we should advance our car 20 cm per frame.
What we need is a precision stopwatch. We will start it before we enter the main loop and query the elapsed time on every iteration. Then we will be able to calculate all the changes in our virtual world based on real time. This will make our game behave in the same way regardless of the processing power of the computer it runs on.
All operating systems provide a high-definition timer. These timers have a precision of fractions of a millisecond. This precision is more than adequate for the purposes of a video game.
In Windows we can use the QueryPerformanceCounter to get the current time. Keeping track of elapsed time is done like this:
double cg_timer::get_elapsed_time()
{
    LARGE_INTEGER qwTime;
    // get current time
    QueryPerformanceCounter(&qwTime);
    // calculate elapsed time since last call
    double fElapsedTime = (double)(qwTime.QuadPart - m_llLastElapsedTime) /
                          (double)m_llQPFTicksPerSec;
    // remember this call, the variable is a member of the class
    m_llLastElapsedTime = qwTime.QuadPart;
    // return elapsed time
    return fElapsedTime;
}
In our program we initialize and start the timer before we enter the main loop. In every iteration we just query the elapsed time which we can use in our calculations. Our first attempt to do some time tracking is counting the frames per second our game runs:
// frame counting mechanism
// the higher the frame rate the faster the system
// if frame rate drops below 30 we are in deep trouble
// we should either optimize the program or buy a new computer
static int m_nFrames = 0;			// frame Counter
static float tot = 0;				// time counter
tot += fElapsed;				// increment counters
m_nFrames++;
if (tot >= 1.f)				// one second reached
{
    char txt[200];
    sprintf_s(txt, "GusOnGames, fps:%d", m_nFrames);
    SetWindowText(g_window.hWnd, txt);
    tot = 0;					// reset counters
    m_nFrames = 0;
}
Summary
This was a simple introduction to OpenGL and Windows. We have managed to create a solid foundation upon which we will build a more sophisticated graphics engine for our applications. In this chapter we have seen:
- How to create a window for our game
- How to initialize and terminate OpenGL
- The basics about drawing with OpenGL
- A simple introduction to transformations and their accumulation
In the next chapter we will dive deeper into the transformations and how they are processed.