Heightmap
In this article we will see a method of generating complex landscapes based on simple images. Well to be honest the image is not as simple as it might look. The technique is called "heightmap" and it is based on the alpha channel values of the image.
Before we proceed with the details we should explain what we are talking about. What is the alpha channel and how do we store any information it? We will cover these things and then continue with the details of the heightmap technique.
Image details
Bitmap images are based on pixels. Each pixel holds the colour information in the form of the values of the three basic colours. If we store each pixel using 256 levels for each of the red, green and blue colours we have a palette of more than 16 million colours, which is more than the human eye can distinguish. This amount of information requires three bytes per pixel since each byte can hold the values of 0 to 255. Along with these three channels we have a fourth channel called the alpha channel. This is mainly used to hold transparency level for each pixel. In gaming though we have found another use for this channel. Instead of using this information for transparency we convert the alpha value of each pixel to vertex altitude.
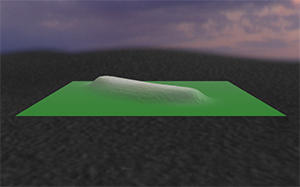
From image to geometry
We need three things when we convert image data to geometry data. First is the altitude variation. This value is multiplied by the value of alpha channel for each pixel in order to calculate its height. The second is the length scale. This is the assumed distance between the pixels in length. Our world geometry is based or 'real' length values, so we need to convert image coordinates and data to world coordinates. The final parameter is the required resolution for the grid we will generate. The grid is generated stepping through the pixels. The resolution parameter specifies how many pixels are skipped with every step.
Here is the code that converts image data to geometry:
bool clf_mesh::load_height_map( char* szPath, float flHeightScale, float flLengthScale, float flResolution )
{
	clf_targa_image imageData;
	// Error-Checking
	if (!imageData.load(get_resource_file_name (szPath, RES_TEX)))
		return false;

	int nTri, nIndex;                                        // Create Variables
	float nX, nZ;
	float flX, flZ;

	int l_w = imageData.get_width();
	int l_h = imageData.get_height();

	if (flResolution < 1.f)
		flResolution = 1.f;

	int v_c = (int)(l_w / flResolution);
	int vcs = (int)(v_c * flResolution);
	while (vcs < l_w)
	{
		v_c ++;
		vcs = (int)(v_c * flResolution);
	}

	// Generate Vertex Field
	m_nVertexCount = v_c*v_c*6;
	m_pVertices = new clf_vector3D[m_nVertexCount*2];       // Allocate Vertex Data
	m_pNormals = &m_pVertices[m_nVertexCount];
	m_pTexCoords = new clf_point2D[m_nVertexCount];         // Allocate Tex Coord Data
	nIndex = 0;
	for( nZ = 0; nZ < l_h; nZ +=  flResolution )
	{
		for( nX = 0; nX < l_w; nX += flResolution )
		{
			for( nTri = 0; nTri < 6; nTri++ )
			{
				// Using This Quick Hack, Figure The X,Z Position Of The Point
				flX = nX + ( ( nTri == 1 || nTri == 2 || nTri == 5 ) ? flResolution : 0.0f );
				flZ = nZ + ( ( nTri == 2 || nTri == 4 || nTri == 5 ) ? flResolution : 0.0f );

				// Set The Data, Using point_height To Obtain The Y Value

				m_pVertices[nIndex].x = (flX - ( l_w / 2 ))*flLengthScale;
				m_pVertices[nIndex].y =
						point_height( imageData.get_image(), l_w, l_h, dti(flX), dti(flZ) ) * flHeightScale;
				m_pVertices[nIndex].z = (flZ - ( l_h / 2 )) * flLengthScale;

				// Stretch The Texture Across The Entire Mesh
				m_pTexCoords[nIndex].x = flX / l_w;
				m_pTexCoords[nIndex].y = flZ / l_h;

				if (nTri == 2)
				{
					m_pNormals[nIndex-2] = m_pNormals[nIndex-1] = m_pNormals[nIndex] =
							calc_face_norm(nIndex-1,nIndex,nIndex-2);
				}
				if (nTri == 5)
				{
					m_pNormals[nIndex-2] = m_pNormals[nIndex-1] = m_pNormals[nIndex] =
							calc_face_norm(nIndex,nIndex-1,nIndex-2);
				}

				// Increment Our Index
				nIndex++;
			}
		}
	}

	// load The Texture Into OpenGL
	m_heightmap = std::string(szPath);
	m_nTextureId = clf_loadTexture(m_heightmap.c_str());

	return true;
}
The geometry information is passed to the display hardware memory to speed up drawing. This is done using Vertex Buffer Objects, which we will see in detail in a future article. For now all we need to know is that this technique creates very fast graphics because it minimizes the amount of data passed to the graphics card for every frame. The geometry is loaded in the superfast graphics memory and is directly accessed by the graphics processor.